
Your web server needs to be configured to use OECGI4. The types of settings required differ from web server to web server. Below are the settings for three of the more common web servers, IIS v7.x, IIS v8.x and Apache.
By default, IIS v7.x and IIS v8.x do not install support for CGI gateways. You need to specifically add this feature using the “Turn Windows Features on and off” option in the Windows Control Panel.
Enabling CGI extensions on IIS 7.x & IIS 8.x
Navigate to the Internet Information Services Options, click on it to expand the options, then click on World Wide Web Services, Application Development Features, and put a tick next to CGI, ISAPI Extensions and ISAPI Filters. To save the changes click the OK button.
Once you have installed support for CGI, you can then open the Internet Information Services (IIS) Manager console. Right Click on My Computer and select Manage. You will find the Internet Information Services (IIS) Manager under the Services and Applications section.
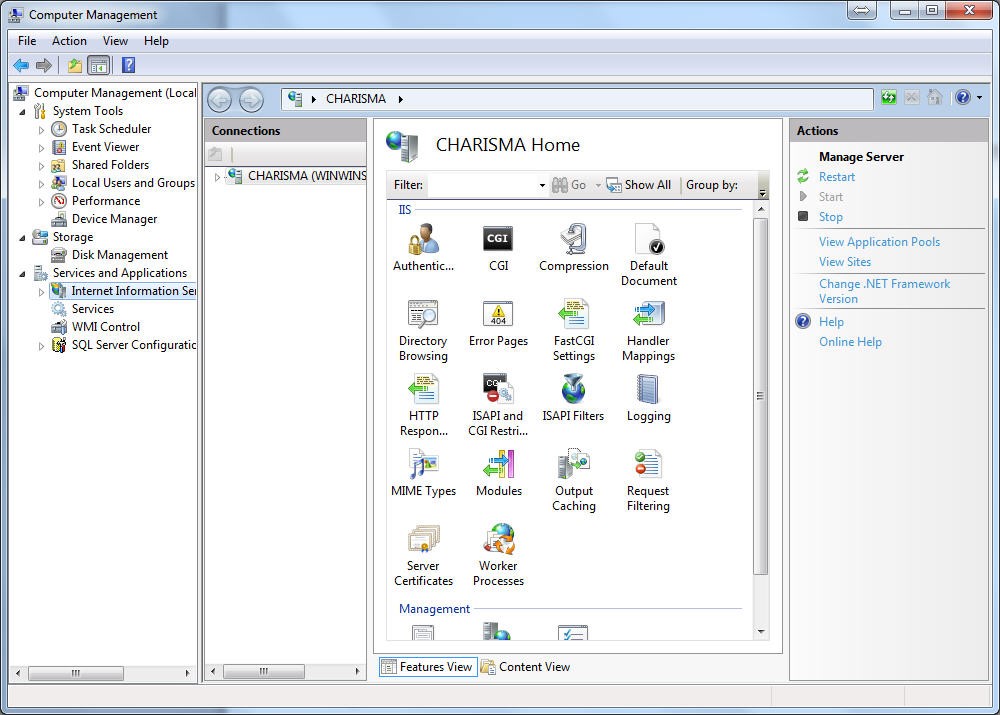
Accessing the Internet Information Services (IIS) Manager console on Windows Windows 7, Windows 8 & Windows 10
Check that the CGI module has been successfully added to IIS. There should be a CGI option in the list of configuration items for the IIS server.

Confirming CGI support is installed in IIS
If the CGI option is not displayed, then please go back and install CGI support using the “Turn Windows Features on and off” option as detailed above.
Step 2 – Register OECGI4 with IIS as a valid extension
Next you need to register OECGI4 as a valid CGI extension. To do this click on the ISAPI and CGI Restrictions option in the web server Home window.

ISAPI and CGI restrictions settings
To add the settings for OECGI4 click on the Add link on the right side of the window.

Adding OECGI4 settings to IIS
This will display the following window. Complete the values as set out below and click OK. Please ensure that you check the “Allow extension path to execute” check box.

Adding OECG4 settings to IIS
You should now see OECGI4 in the list of known CGI extensions.

OECGI4 is now added as a valid CGI extension.
A virtual directory is a friendly name, or alias, for a physical directory on your server hard drive. You need to create a virtual directory to the c:\Revsoft\OInsight\o4w directory where OECGI4.EXE is located.

Adding a Virtual Directory to IIS 7 or IIS 8
Add the following settings to the Add Virtual Directory Window.

Virtual Directory Window
Go to the newly added virtual directory home page by clicking on the name of the virtual directory in the connections list on the left of the console. Then select the Handler Mappings option from the list.

Adjusting Security settings for OECGI4 on IIS v7.x
This will open the Handler Mappings options. To add the required values for OECGI4 click on the Add Script Map link under Actions on the right side of the window.

Adding security settings for OECGI4
This will open the Add Script map window. Complete the values as below.

Adding the Security settings for OECGI4
You need to click on the Request Restrictions push button to add in some extra values. This will display the Request Restrictions window. Go to the Access tab and select the Execute option. Then click Ok to close this window.

Adding the Execute Option for OECIG4
Then click OK to save and close the Add Script map Window. A message may appear like the one below. Click the Yes button

Confirming the OECGI4 security settings.
OECGI4 should now appear in the list of enabled handler Mappings
If, for some reason OECGI4 appears in the disabled list rather than the enabled list, simply right click on OECGI4 and select Edit Feature Permissions.

Enabling OECGI4 if it's in the disabled list

Selecting the Edit Feature Permissions option
Make sure that you tick the Execute option then click OK.

Enabling the Execute option
OECGI4 should now appear in the Enabled list.
This completes the setup steps for IIS 7.x or IIS 8.x. To create additional virtual directories, simply repeat steps 3 and 4, above.
By default, IIS v7.x & IIS v8.x does not install support for CGI gateways. You need to specifically add this feature using the Server Manager. Open the Server Manager, click on “Roles” and then click on “Add Roles”


Enabling CGI extensions on IIS 7.x & IIS 8.x
Navigate to the Web Server (IIS), click on it to expand the options, then click on Web Server, Application Development, and put a tick next to CGI, ISAPI Extensions and ISAPI Filters. To save the changes click the Install button.
Once you have installed support for CGI, you can then open the Internet Information Services (IIS) Manager console. Right Click on This PC and select Manage. You will find the Internet Information Services (IIS) Manager under the Tools section of Server Manager.

Starting Internet Information Services (IIS) Manager
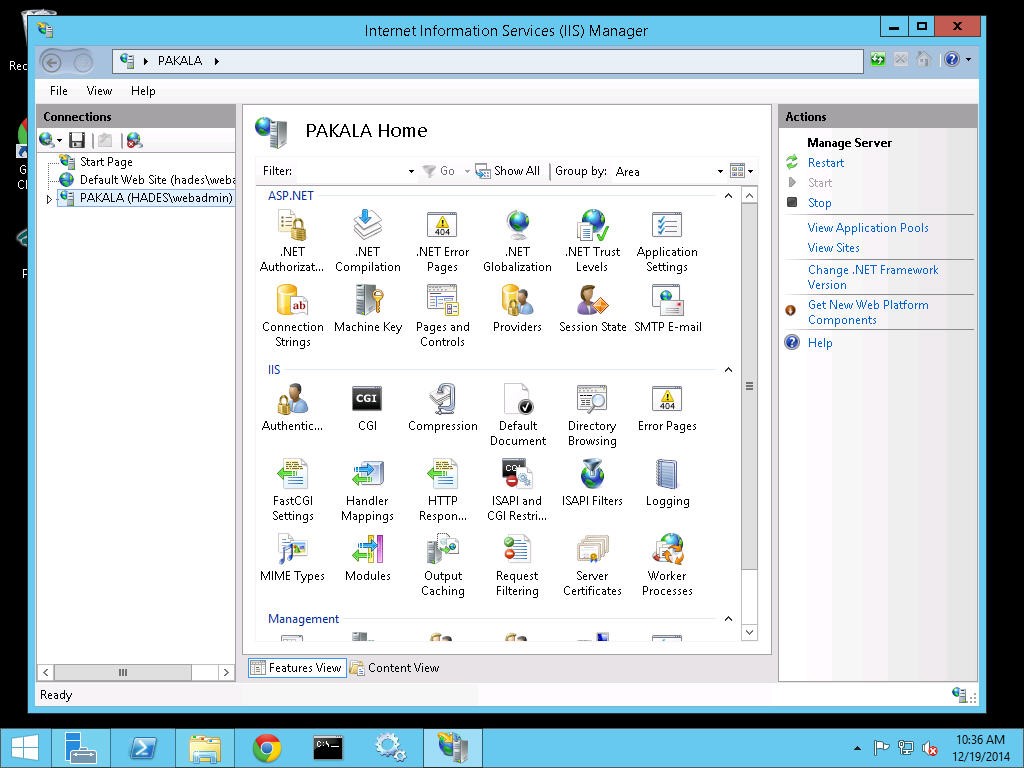
Accessing the Internet Information Services (IIS) Manager console on Windows Server 2008 & Windows Server 2012
Check that the CGI module has been successfully added to IIS. There should be a CGI option in the list of configuration items for the IIS server.

Confirming CGI support is installed in IIS
If the CGI option is not displayed, then please go back and install CGI support using the “Turn Windows Features on and off” option as detailed above.
Next you need to register OECGI4 as a valid CGI extension. To do this click on the ISAPI and CGI Restrictions option in the web server Home window.

ISAPI and CGI restrictions settings
To add the settings for OECGI4 click on the Add link on the right side of the window.

Adding OECGI4 settings to IIS
This will display the following window. Complete the values as set out below and click OK. Please ensure that you check the “Allow extension path to execute” check box.

Adding OECG4 settings to IIS
You should now see OECGI4 in the list of known CGI extensions.

OECGI4 is now added as a valid CGI extension.
A virtual directory is a friendly name, or alias, for a physical directory on your server hard drive. You need to create a virtual directory to the c:\Revsoft\OInsight\o4w directory where OECGI4.EXE is located.

Adding a Virtual Directory to IIS 7 or IIS 8
Add the following settings to the Add Virtual Directory Window.

Virtual Directory Window
Go to the newly added virtual directory home page by clicking on the name of the virtual directory in the connections list on the left of the console. Then select the Handler Mappings option from the list.

Adjusting Security settings for OECGI4 on IIS v7.x
This will open the Handler Mappings options. To add the required values for OECGI4 click on the Add Script Map link under Actions on the right side of the window.

Adding security settings for OECGI4
This will open the Add Script map window. Complete the values as below.

Adding the Security settings for OECGI4
You need to click on the Request Restrictions push button to add in some extra values. This will display the Request Restrictions window. Go to the Access tab and select the Execute option. Then click Ok to close this window.

Adding the Execute Option for OECIG4
Then click OK to save and close the Add Script map Window. A message may appear like the one below. Click the Yes button

Confirming the OECGI4 security settings.
OECGI4 should now appear in the list of enabled handler Mappings
If, for some reason OECGI4 appears in the disabled list rather than the enabled list, simply right click on OECGI4 and select Edit Feature Permissions.

Enabling OECGI4 if it's in the disabled list

Selecting the Edit Feature Permissions option
Make sure that you tick the Execute option then click OK.

Enabling the Execute option
OECGI4 should now appear in the Enabled list.
This completes the setup steps for IIS 7.x or IIS 8.x. To create additional virtual directories, simply repeat steps 3 and 4, above.